Can you speak a little louder? I cannot hear you! As we age, our senses are not the same as when we were younger. Your vision, taste buds and hearing all decline with age. There are various reasons for this happening such as a lessened ability to have a healthy circulatory system. Less nutrition is available for the body to use to repair and recover, as well as less movement that stimulates the lymphatic system and circulation which helps to detoxify the body.
The combination of these factors causes us to age; it is a part of life. That does not mean we cannot do the best we can to keep ourselves youthful and full of vitality.
One of the most difficult parts of aging is hearing. I actually have two elderly neighbors that both have hearing aids and every once in a while I have to raise my voice for them to hear me better even with the hearing aid in and on.
The body uses certain mechanisms to keep your ear and eardrum healthy but because of modern diets that lack nutrition some of our built-in human health mechanisms have started to work against us. An example could be that your skin or hair do not have the proper healthy fats they need, so they dry out easily, and you get a dry scalp, dry hair or eczema. The same is true for all of the senses. They need nutrients and compounds found in nutrient-dense food.
Our body, health and senses become compromised when they lack this. The ear drums contain earwax for a reason, but imbalances in human health can affect our ears as well. Being hard of hearing, having ringing or buzzing sounds in the ears (also known as tinnitus) can happen because of an imbalance in one’s body.
Earwax, also known by the medical term cerumen, is a yellowish waxy substance that is secreted in the ear canal. It protects the skin of the human ear canal, assists in cleaning and lubrication, and also provides some protection from bacteria, fungi, insects and water.
Just like your skin and hair produce oils naturally for protection your eardrum does as well. The only challenge with your eardrum is that, if you do not wash your ears that well or the wax dries out, you’ll have too much earwax stuck in your ear. This can make hearing difficult, cause hearing loss, trigger irritation or cause tinnitus.
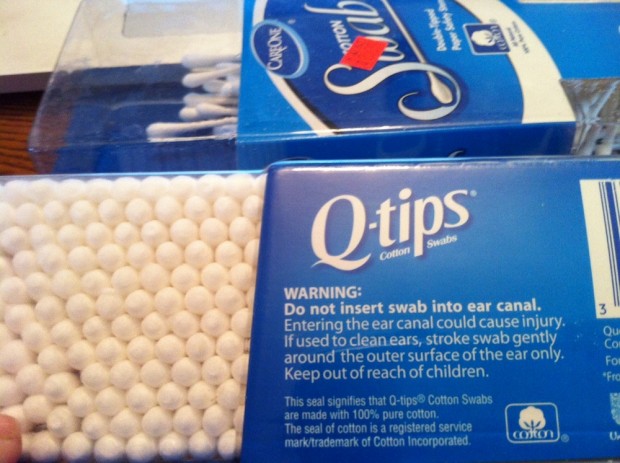
Most people try to remove excess earwax with a q-tip but that is unfortunately not the best way and not advised by me at all. The reason? By putting a Q-tip into your ear, you’re actually pushing earwax further into your ear causing more buildup. Sure, you may remove a little bit but think about it. You are pushing a small cotton swab in your ear to try to yank earwax out. There’s got to be a better way, a way to pull that excess earwax out without potentially pushing it in further causing hardening, dry ears, and more earwax buildup.
In fact, Q-tips themselves do not recommend putting them in the ear canal. Who has not put a Q-tip in their ear canal before though? Check out the label here:
 Thankfully there is a cheap, easy, more effective and healthier solution. It is known as ear candling.
Ear candling is a process that uses a candle and a flame to create oxygen that will literally melt and suck excess earwax out of your ear. Consider trying this if you are hard of hearing, have irritation in your ear or if you have ringing or buzzing (tinnitus) in your eardrum.
How To Ear Candle:
What you’ll need:
- Lighter or matches
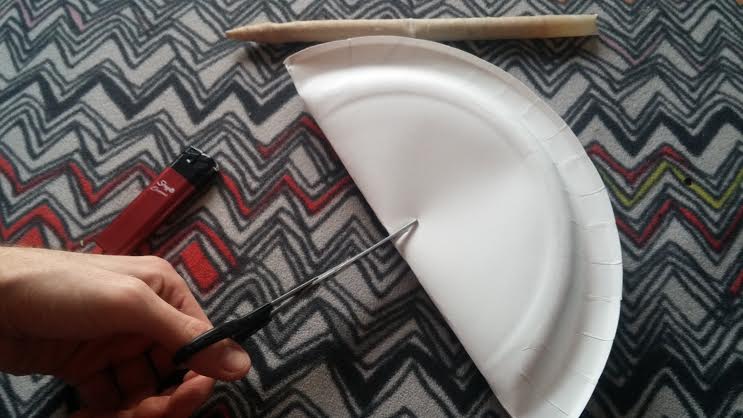
- A paper plate
- Scissors
- Ear Candles (check your local health food store or online.)
Directions:
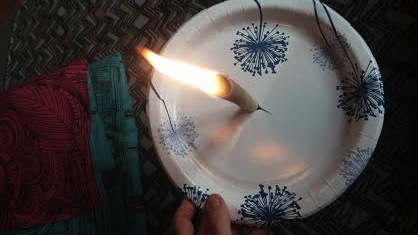
Step 1: Fold the paper plate in half and cut a slit about 1/2 inch wide. This should be a big enough hole for the ear candlestick to go through it once it is unfolded again.
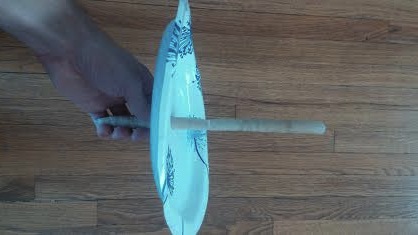
Step 2: Stick the ear candle in the paper plate with the pointy end facing down towards the bottom side of the plate. It should stay in the paper plate all by itself. You should be able to hold the candle without touching the plate, and the plate should not move.
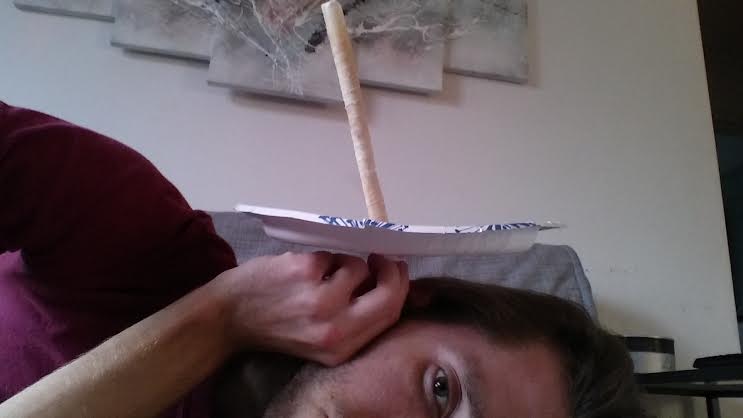
Step 3: Have an approximate 4-inch gap between your ear and the plate with the candle creating that gap. Stick the ear candle in your ear (pointy end) with the plate floating above.
Step 4: Have a friend light the top end (away from your face) on fire with a lighter or matches.
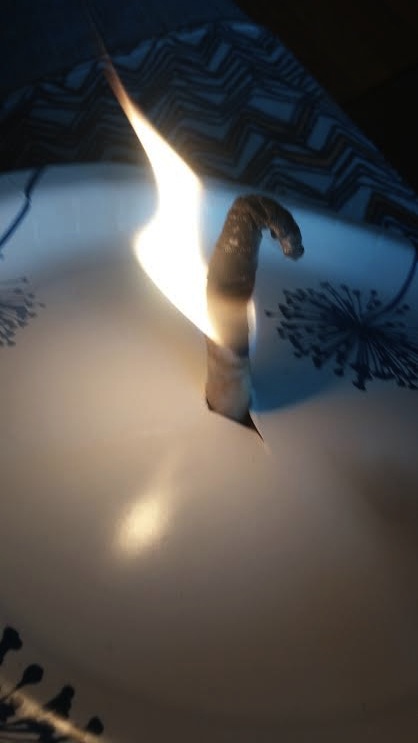
Step 5: Hold the candle and let it burn! The heat generated by the small flame will create a heat & oxygen vacuum that will suck excess wax out of your ear.
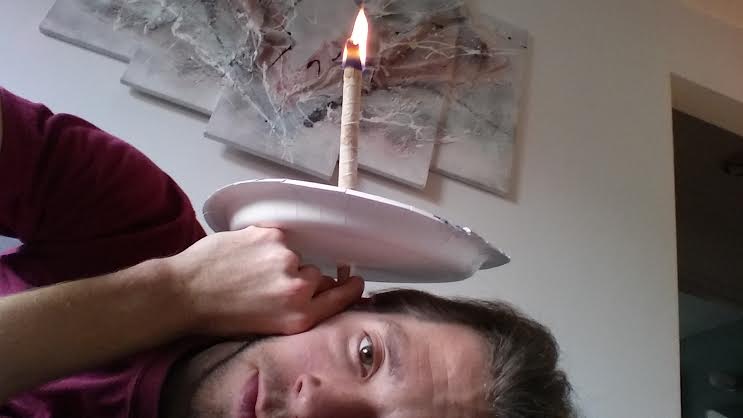
Step 6 is important: Make sure to keep the plate as a barrier between the flaming candle and your face. Sometimes excess ear candle ashes will fall, and the plate will catch these. Then (after several minutes) be sure to put the flame out when it comes within a few inches of the plate to be safe as shown in the picture below.
 You can take the ear candle after this is complete and cut off the end with scissors then unwrap it to see all the ear wax that it pulled out of your ear.
It is quite extraordinary and much more efficient than a simple Q-tip!
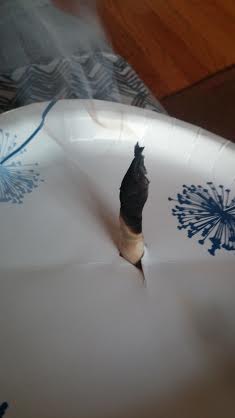
Once it is done, blow the flame completely out and let the smoke fade away. You can then unwrap it once it has cooled off!
You can ear candle both ears, or just the one ear that’s is giving you problems. Hopefully, you find this useful and give it a shot!
Here’s a video showing how to ear candle from start to finish:
Image & Source: commonhealth.wbur.org, webwhispering.net